
Introduction
The reinstallation of a brake drum, seemingly a routine maintenance procedure, can be unexpectedly hindered when the drum fails to seat correctly onto the hub. This issue, often described as a brake drum not going back on, represents a significant safety concern and necessitates a thorough understanding of the underlying mechanics and potential contributing factors. Brake drums are critical components of the braking system, responsible for dissipating heat generated during braking and providing a friction surface for the brake shoes. Their proper functioning is paramount for vehicle safety. This guide will delve into the material science, manufacturing tolerances, performance considerations, failure modes, and maintenance protocols related to this common yet complex problem. The focus is on identifying root causes – often a combination of factors – rather than simply attempting to force the drum into position, which can cause further damage. We will cover common scenarios encountered in light-duty and heavy-duty vehicle applications, detailing the intricate interplay between the drum, hub, wheel studs, and brake shoe assembly.
Material Science & Manufacturing
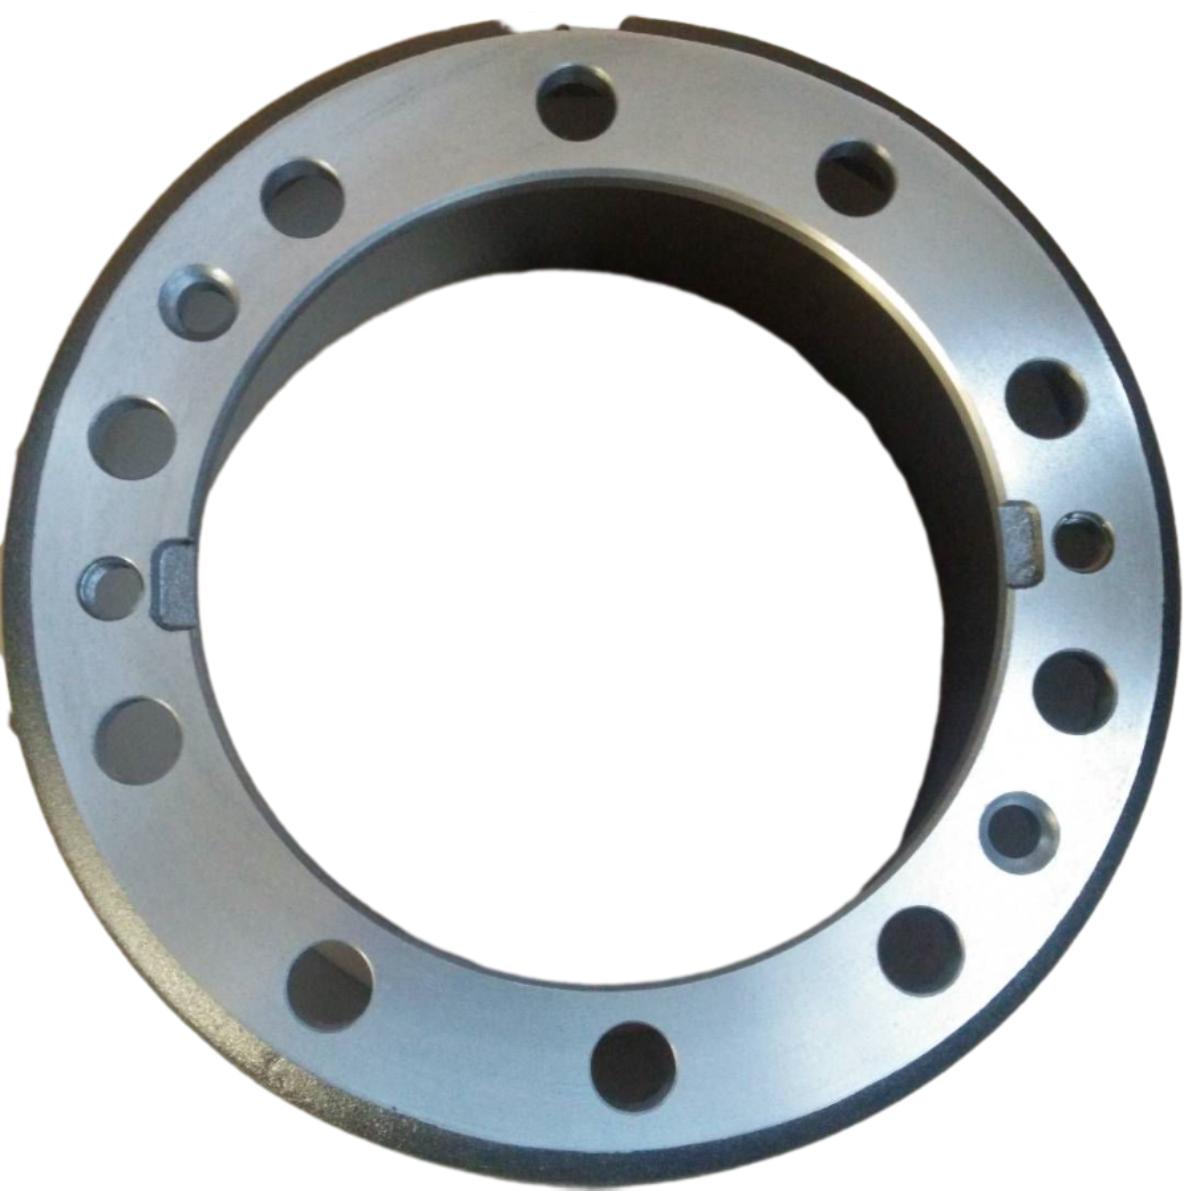
Brake drums are typically manufactured from gray cast iron, due to its superior heat dissipation characteristics, wear resistance, and relatively low cost. The specific grade of cast iron (e.g., ASTM A48 Class 30) dictates its tensile strength, hardness, and thermal conductivity. The manufacturing process generally involves sand casting, where molten iron is poured into a mold created with the desired drum shape. Critical parameters during casting include cooling rate and alloy composition, which directly influence the microstructure of the cast iron. A fine, evenly distributed graphite flake structure is ideal for maximizing wear resistance. Alternatively, some high-performance brake drums utilize nodular cast iron (ductile iron) which offers significantly higher strength and toughness. Machining follows casting, ensuring precise dimensions and a smooth braking surface. Key manufacturing tolerances include drum diameter, runout, and the concentricity of the mounting surface. Hubs, conversely, are frequently constructed from steel alloys—often medium carbon steels like 4140 or 4150—providing the necessary strength to withstand the clamping forces. Surface finishing of both the drum and hub is critical; corrosion or the presence of debris (rust, dirt, old brake shoe material) can create interference during reassembly. The coefficient of thermal expansion differences between cast iron and steel play a role; drums heated during operation will contract upon cooling, influencing the fitment. The presence of any machining imperfections, such as localized distortion or uneven surfaces, exacerbate the issue.
Performance & Engineering
The primary engineering challenge with brake drums revolves around managing thermal stress and ensuring consistent frictional performance. During braking, kinetic energy is converted into thermal energy, causing the drum to heat up significantly. This thermal expansion must be accounted for in the design to prevent warping or cracking. Finite element analysis (FEA) is commonly employed to model stress distribution within the drum under various braking loads. The drum's thickness and fin design (internal ribs) are optimized to enhance heat dissipation. The force required to seat the drum onto the hub is a critical parameter. This force must overcome static friction, any surface irregularities, and the clamping force from the wheel studs. The hub-to-drum interface must be designed to allow for a sufficient degree of axial movement, accounting for thermal expansion and contraction. The brake shoe assembly exerts a radial force against the inner surface of the drum. Proper adjustment of the brake shoes is vital; excessively tight shoes can create drag and accelerate drum wear. Improperly adjusted or worn brake shoes can contribute to the difficulty of drum removal and reinstallation. Corrosion on the mating surfaces of the drum and hub dramatically increases the force needed for assembly, potentially exceeding the material yield strength and causing damage. The design must also consider compliance with regulatory standards regarding braking performance and safety, including fade resistance and heat rejection capabilities.
Technical Specifications
| Parameter | Typical Value (Light Duty Vehicle) | Typical Value (Heavy Duty Vehicle) | Measurement Standard |
|---|---|---|---|
| Drum Diameter | 203 - 325 mm | 325 - 406 mm | SAE J477 |
| Drum Width | 38 - 76 mm | 76 - 152 mm | SAE J477 |
| Material | Gray Cast Iron (ASTM A48 Class 30) | Gray Cast Iron or Nodular Cast Iron | ASTM A48, ASTM A47 |
| Surface Finish (Drum Hub Mating Surface) | Ra < 1.6 µm | Ra < 2.5 µm | ISO 4287 |
| Maximum Runout | 0.05 mm | 0.13 mm | SAE J477 |
| Wheel Stud Diameter | M12 x 1.5 | M16 x 1.5 or M18 x 1.5 | ISO 898-1 |
Failure Mode & Maintenance
Failure modes leading to brake drum reinstallation difficulties are diverse. Rust and corrosion are the most common culprits, forming a tenacious bond between the drum and hub. This is exacerbated by exposure to road salt and moisture. Deformation of the drum, either due to overheating or impact damage, can also impede proper seating. Warping introduces runout and prevents the drum from sitting flush against the hub face. Wheel stud damage – bent or broken studs – obviously prevents correct clamping and can physically obstruct drum installation. Accumulation of brake dust and debris between the drum and hub creates an uneven surface, increasing friction and resistance. Fatigue cracking, particularly around the mounting holes, can lead to ovalization of the drum and difficulty in alignment. Maintenance procedures to prevent these issues include regular cleaning of the hub and drum mating surfaces during brake service, application of a thin layer of anti-seize lubricant (specifically designed for brake components) to prevent corrosion, inspection of wheel studs for damage, and ensuring proper brake shoe adjustment. If a drum is significantly warped or corroded, replacement is the only viable option. When reinstalling, ensure the wheel studs are clean and lubricated, and use a wheel lug wrench to evenly tighten the lug nuts in a star pattern. Avoid forceful hammering, as this can damage the drum or hub. A rubber mallet can be used gently to assist in seating the drum.
Industry FAQ
Q: What are the initial steps I should take when encountering a brake drum that won’t seat properly?
A: The first step is a thorough visual inspection. Examine the hub and drum mating surfaces for rust, corrosion, or debris. Check the wheel studs for damage. Attempt to rotate the drum; any significant resistance or binding indicates a problem. Do not force the drum. Use a wire brush and brake cleaner to remove any visible contamination. Next, verify the brake shoe clearance – ensure they aren't binding against the drum.
Q: Is the use of penetrating oil acceptable on the hub-to-drum mating surface?
A: While tempting, using general-purpose penetrating oil is not recommended. These oils can contaminate the brake lining material, reducing braking efficiency. If lubrication is necessary, use a specialized anti-seize lubricant formulated explicitly for brake components. Apply it sparingly to the hub’s center pilot and wheel studs.
Q: What level of runout is considered unacceptable for a brake drum?
A: Excessive runout indicates a warped or damaged drum. For light-duty vehicles, runout exceeding 0.05 mm is generally considered unacceptable. Heavy-duty vehicles may tolerate slightly higher runout, but exceeding 0.13 mm warrants drum replacement. Runout is measured using a dial indicator.
Q: Can a warped brake drum be machined to correct the issue?
A: Machining a brake drum is possible, but there are limitations. The drum must have sufficient material thickness remaining after machining to maintain its structural integrity and heat dissipation capacity. There are minimum thickness specifications outlined by the vehicle manufacturer; exceeding these limits renders the drum unsafe for use. Professional machining is crucial to ensure a smooth, concentric surface.
Q: What proactive measures can be taken to prevent drums from seizing onto hubs?
A: Regular preventative maintenance is key. During brake service, thoroughly clean the hub and drum mating surfaces. Apply a thin coat of brake-specific anti-seize lubricant. Ensure proper brake shoe adjustment to prevent dragging. Inspect and replace corroded or damaged wheel studs promptly. Avoid prolonged exposure to corrosive environments (e.g., road salt).
Conclusion
Successfully addressing the issue of a brake drum not going back on requires a systematic approach based on a solid understanding of material science, manufacturing tolerances, and braking system mechanics. Identifying the root cause – be it corrosion, deformation, debris, or damaged components – is paramount. Simply applying force can exacerbate the problem and compromise safety. By adhering to proper maintenance procedures, employing appropriate lubrication, and recognizing the limitations of component repair, technicians can effectively resolve this common issue and ensure optimal braking performance.
The long-term reliability and safety of braking systems depend on meticulous attention to detail during installation and maintenance. Regularly inspecting components, addressing corrosion proactively, and adhering to manufacturer specifications are crucial. Continued advancements in materials science and manufacturing techniques are leading to more durable and reliable brake drum designs, but proper maintenance remains the cornerstone of safe and effective braking performance.